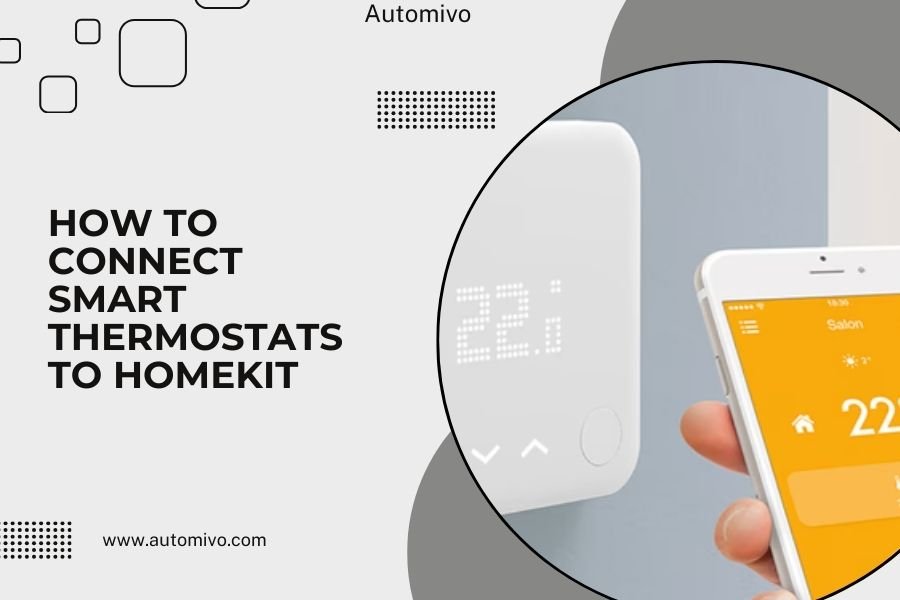
Connecting smart thermostats to HomeKit requires the Home app on your iPhone or iPad and a HomeKit-compatible thermostat model. Most popular brands like Ecobee, Honeywell, and some Nest models work seamlessly with Apple’s smart home platform.
The setup process takes about 5-10 minutes and involves scanning a HomeKit code or entering it manually through the Home app. Once connected, you can control temperature, create automations, and use Siri voice commands.
What Makes a Thermostat HomeKit Compatible
Not all smart thermostats work with HomeKit. You need a device that supports Apple’s HomeKit protocol.
Think of HomeKit like a special language your thermostat needs to speak. Without this language, your iPhone can’t talk to your heating system.
Popular HomeKit-Compatible Thermostat Brands
- Ecobee SmartThermostat and Ecobee3 Lite
- Honeywell T6 Pro and T9
- Nest Thermostat (3rd generation and newer)
- iDevices Thermostat
- Lyric T5 and T6
Check Your Model Number
Look for the HomeKit logo on your thermostat’s box or manual. You can also check the manufacturer’s website with your exact model number.
If you don’t see HomeKit support listed, your thermostat won’t connect directly to the Home app.
Pre-Setup Requirements
Before you start connecting, make sure you have everything ready. This saves time and prevents frustration.
What You Need
- iPhone or iPad with iOS 10 or later
- Home app (pre-installed on newer devices)
- WiFi network with internet connection
- Your thermostat’s HomeKit setup code
Finding Your HomeKit Setup Code
The 8-digit HomeKit code appears in different places depending on your thermostat model. Look for it on a sticker on the device itself, inside the battery compartment, or on the quick setup guide.
Some thermostats display the code on their screen during setup mode.
Network Connection Check
Your thermostat needs a strong WiFi signal. I found that thermostats work best when they get at least 3 bars of signal strength.
If your thermostat location has weak WiFi, consider adding a WiFi extender nearby.
Step-by-Step Connection Process
Ready to connect? The process is pretty straightforward once you know the steps.
Step 1: Open the Home App
Find the Home app on your iPhone or iPad. It looks like a simple house icon with an orange roof.
If you can’t find it, download it free from the App Store.
First Time Using Home App
The app will ask you to create a home and add your location. This helps with location-based automations later.
Give your home a name like “My House” or your family name.
Step 2: Add New Accessory
Tap the plus sign (+) in the top right corner. Then select “Add Accessory.”
Your iPhone’s camera will open, ready to scan a HomeKit code.
Camera Scanning Tips
Hold your phone about 6 inches from the HomeKit code. Make sure you have good lighting.
The code looks like a square barcode with “HomeKit” written underneath.
Step 3: Scan or Enter the Code
Point your camera at the HomeKit setup code. The app should recognize it automatically.
Can’t scan? Tap “Don’t Have a Code or Can’t Scan?” to enter the 8-digit number manually.
Manual Entry Method
Type the code exactly as shown. Use dashes if they appear in the code format.
Double-check each number. One wrong digit means starting over.
Step 4: Wait for Connection
Your iPhone will search for the thermostat. This usually takes 30-60 seconds.
You’ll see a spinning wheel and “Looking for accessory” message.
If Connection Fails
Make sure your thermostat is in pairing mode. Some models need you to press and hold specific buttons.
Check that both your iPhone and thermostat connect to the same WiFi network.
Step 5: Configure Settings
Once connected, the Home app asks for basic setup information.
- Choose a room (like “Living Room” or “Bedroom”)
- Name your thermostat
- Test the connection
Room Assignment Importance
Choosing the right room helps with Siri commands. You can say “Hey Siri, set the living room to 72 degrees.”
You can always change the room later in the Home app settings.
Troubleshooting Common Connection Issues
Sometimes things don’t go smoothly. Here are fixes for the most common problems.
Code Won’t Scan
Clean your camera lens and make sure the HomeKit sticker isn’t damaged or dirty.
Try different lighting. Too bright or too dim can cause scanning problems.
Alternative Solutions
Enter the code manually if scanning keeps failing. Some older iPhone cameras struggle with certain code formats.
You can also try scanning from different angles or distances.
Device Not Found Error
This usually means your thermostat isn’t in pairing mode or has WiFi connection issues.
Reset your thermostat’s network settings and try again. The process varies by brand, so check your manual.
WiFi Network Problems
Make sure your thermostat connects to a 2.4GHz network. Many smart thermostats don’t work with 5GHz networks.
Restart your router if multiple devices have connection problems.
Setup Code Already Used
Each HomeKit code works only once per Apple ID. If you get this error, someone already added this thermostat.
Check if family members already connected the device. You can share access through Home app sharing features.
Using Your Connected Thermostat
Now comes the fun part. Your thermostat works with all HomeKit features.
Basic Controls
Open the Home app and tap your thermostat tile. You can adjust temperature, change modes, and view current conditions.
The interface shows current temperature, target temperature, and heating/cooling status.
Control Center Access
Add Home controls to your iPhone’s Control Center for quick access. Go to Settings > Control Center and add “Home.”
Swipe down from the top right corner to access temperature controls anytime.
Siri Voice Commands
Voice control makes temperature adjustments super convenient. Try these commands:
- “Hey Siri, set the temperature to 72”
- “Hey Siri, make it warmer”
- “Hey Siri, turn off the heat”
- “Hey Siri, what’s the temperature?”
Room-Specific Commands
If you have multiple thermostats, include the room name. “Hey Siri, set the bedroom to 68 degrees.”
This prevents Siri from adjusting the wrong thermostat.
Creating Automations
Automations run without any input from you. They’re like having a smart assistant manage your home temperature.
In the Home app, tap Automation at the bottom. Then tap the plus sign to create new rules.
Popular Automation Ideas
| Trigger | Action | Benefit |
|---|---|---|
| Leave home | Lower temperature 5 degrees | Save energy costs |
| Arrive home | Set to comfortable temperature | Walk into comfort |
| 10 PM daily | Night temperature setting | Better sleep comfort |
| Sunrise | Gradually warm up house | Wake up comfortable |
Advanced HomeKit Integration
Once you’re comfortable with basic controls, explore advanced features.
Scenes and Shortcuts
Scenes control multiple devices at once. Create a “Good Night” scene that lowers temperature and turns off lights.
You can trigger scenes with Siri, the Home app, or automation rules.
Creating Useful Scenes
Think about your daily routines. What temperature and lighting combinations do you use most?
I found that most people benefit from Morning, Away, Home, and Night scenes.
Family Sharing
Share home control with family members through iCloud Family Sharing. Everyone gets access to the same thermostats and automations.
Go to Home app settings and tap “Invite People” to add family members.
Permission Levels
You can give family members different access levels. Some can only control devices, while others can create automations and add new accessories.
Kids usually get basic control access without automation editing rights.
Maintaining Your Connection
Keep your smart thermostat running smoothly with regular maintenance.
Software Updates
Check for firmware updates in your thermostat’s companion app. Many brands release updates that improve HomeKit compatibility.
Enable automatic updates if your thermostat supports this feature.
iOS Updates
Keep your iPhone updated too. Apple regularly improves HomeKit performance and adds new features.
New iOS versions often fix connectivity bugs that affect smart home devices.
WiFi Network Health
Smart thermostats need consistent internet access. Monitor your network for stability issues.
If your thermostat frequently shows “No Response” in the Home app, check your WiFi signal strength at the thermostat location.
Network Troubleshooting
Restart your router monthly to prevent connection problems. Unplug it for 30 seconds, then plug it back in.
Consider upgrading your internet plan if you have many smart home devices competing for bandwidth.
Privacy and Security
HomeKit uses strong encryption to protect your data. All communication between your iPhone and thermostat stays secure.
Apple doesn’t store your home automation data on their servers. Everything processes locally on your devices.
Best Security Practices
Use strong WiFi passwords and enable WPA3 security if your router supports it.
Keep your Apple ID secure with two-factor authentication. This protects access to all your HomeKit devices.
Guest Access
Create a separate guest WiFi network for visitors. This prevents unknown devices from accessing your smart home network.
Only share home access with trusted family members and friends.
Conclusion
Connecting smart thermostats to HomeKit opens up a world of convenient temperature control. The setup process takes just a few minutes, but the benefits last for years.
Start with basic temperature controls and Siri commands. Then explore automations and scenes as you get comfortable with the system. Remember to keep your devices updated and maintain strong network security.
Your smart thermostat becomes much more useful when integrated with HomeKit’s ecosystem. You’ll save energy, improve comfort, and enjoy the convenience of voice control and automated temperature management.
Can I connect multiple thermostats to HomeKit?
Yes, you can connect as many HomeKit-compatible thermostats as you want. Each thermostat needs its own HomeKit setup code and appears as a separate device in the Home app. This works great for multi-zone heating systems or homes with multiple HVAC units.
What happens if my WiFi goes down?
Your thermostat continues working locally with its programmed schedule, but you lose remote control through the Home app. Manual controls on the thermostat itself still function normally. Once WiFi returns, HomeKit connectivity resumes automatically.
Do I need an Apple TV or HomePod for HomeKit thermostats?
You only need a home hub (Apple TV, HomePod, or iPad) for remote access and automations when you’re away from home. Local control through the Home app works without a hub when you’re connected to the same WiFi network as your thermostat.
Can Android users control HomeKit thermostats?
No, HomeKit only works with Apple devices. Android users need thermostats that support Google Assistant or Samsung SmartThings instead. Some thermostats support multiple platforms, but you need to choose one ecosystem during setup.
Will connecting to HomeKit void my thermostat warranty?
No, using HomeKit features as designed by the manufacturer won’t void your warranty. HomeKit is a standard feature on compatible thermostats. Problems only arise if you modify the device’s hardware or install unauthorized firmware.