
A thermostat power extender kit connects to your existing thermostat wiring to provide 24V power when your current setup lacks a C-wire or common wire.
Installing a thermostat power extender kit typically takes 30-60 minutes and requires basic electrical knowledge, wire strippers, and access to your HVAC system’s control board.
Your smart thermostat needs steady power to run its display, Wi-Fi connection, and advanced features. But many older homes don’t have that extra C-wire. That’s where a power extender kit saves the day.
Think of it like adding a power adapter to your thermostat setup. The kit creates the missing power connection your smart thermostat craves.
What Is a Thermostat Power Extender Kit
A power extender kit is a small device that solves the missing C-wire problem. It has two main parts: a power module and an isolation relay.
The power module connects to your HVAC system’s control board. The isolation relay connects behind your thermostat. Together, they create a power path using your existing wires.
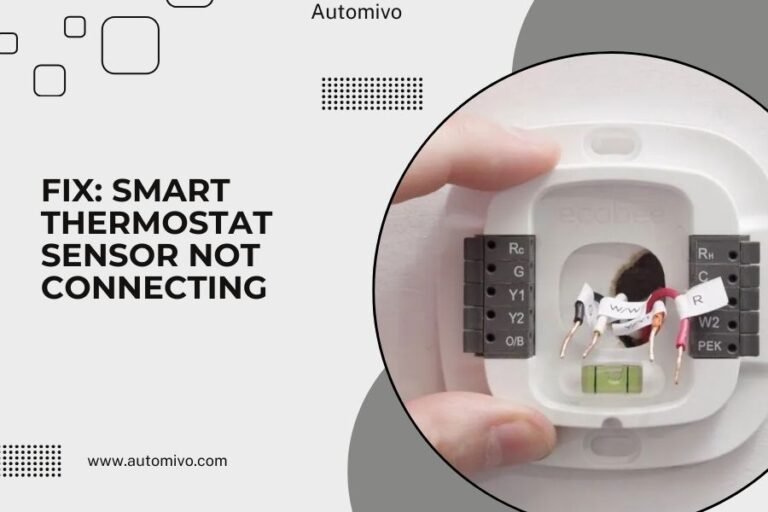
I found that most major thermostat brands offer their own power extender kits. Nest, Ecobee, and Honeywell all make versions that work with their thermostats.
How Power Extender Kits Work
The system uses your existing thermostat wires in a clever way. Instead of running new wire through your walls, it sends power signals through the wires you already have.
One component goes at your HVAC unit. The other goes behind your thermostat. They communicate through your existing wire bundle.
When You Need a Power Extender Kit
You need this kit if your thermostat keeps losing power, restarting randomly, or showing low battery warnings constantly.
Check your current wiring first. Count the wires connected to your old thermostat. If you see four or fewer wires, you probably need a power extender.
Tools and Materials You’ll Need
Gather these items before you start your installation:
- Power extender kit (specific to your thermostat brand)
- Wire strippers
- Screwdriver set
- Voltage tester
- Wire nuts or connectors
- Electrical tape
- Flashlight or headlamp
Safety Equipment
You’re working with electrical systems, so safety comes first. Turn off power at your circuit breaker before starting any work.
Keep your voltage tester handy. Test wires before touching them, even after turning off the breaker.
Step-by-Step Installation Process
The installation happens in two locations: your thermostat wall and your HVAC system. We’ll start at the thermostat since that’s usually easier to access.
Step 1: Turn Off Power
Find your HVAC system’s circuit breaker and flip it off. This cuts power to your furnace, air conditioner, and thermostat.
Wait five minutes after turning off power. Some systems hold electrical charge briefly.
Step 2: Remove Your Current Thermostat
Take a photo of your current wiring before disconnecting anything. This photo will be your roadmap if something goes wrong.
Remove the thermostat from its base plate. Unscrew the base plate from the wall. You’ll see your wire bundle coming through the wall.
Document Your Current Wiring
Write down which colored wire connects to each terminal letter. Common connections include R (red), W (white), Y (yellow), and G (green).
Step 3: Install the Isolation Relay
The isolation relay is the small component that stays behind your thermostat. Connect your existing thermostat wires to the relay’s input terminals.
Match the wire colors and terminal letters exactly as they were before. The relay acts like a translator between your old wires and new thermostat.
Connect Thermostat Wires to Relay
Strip about 1/4 inch of insulation from each wire end. Insert wires into the relay terminals and tighten the screws.
Tug gently on each wire after connecting. They shouldn’t pull out easily.
Step 4: Run New Wires to Thermostat
The relay comes with new wires that connect to your smart thermostat. These wires carry both control signals and power.
Connect these new wires to your thermostat’s base plate according to the kit instructions.
Installing the Power Module
Now we move to your HVAC system location. This might be in your basement, garage, or utility closet.
Step 5: Locate Your HVAC Control Board
Remove the access panel on your furnace or air handler. Look for a rectangular circuit board with wire terminals.
The control board usually has labels like R, C, W, Y, and G. These match your thermostat wire functions.
Identify the C Terminal
Find the C terminal on your control board. This is where the power module connects to provide that missing common wire power.
Step 6: Connect the Power Module
The power module connects to two places on your control board: the C terminal and the terminal where your thermostat wire bundle connects.
Follow the kit’s wiring diagram exactly. Different brands have slightly different connection methods.
Secure All Connections
Make sure all wire connections are tight. Loose connections cause intermittent power problems later.
Use wire nuts for any spliced connections. Wrap connections with electrical tape for extra security.
Step 7: Test the Installation
Put everything back together and restore power at the circuit breaker. Your smart thermostat should power up immediately.
Check that the thermostat display stays on constantly. No more dimming or battery warnings.
Troubleshooting Common Issues
Sometimes installations don’t work perfectly on the first try. Here are the most common problems and fixes.
Thermostat Won’t Power On
Double-check all your connections at both the thermostat and HVAC system. One loose wire can kill the whole setup.
Verify that you restored power at the circuit breaker. It’s easy to forget this step.
Heating or Cooling Won’t Start
This usually means a control wire is connected wrong. Compare your connections to the photo you took earlier.
Make sure you connected the isolation relay correctly. The input and output sides can’t be swapped.
Check Wire Labels
Some wire colors don’t match standard conventions. Go by the terminal labels on your old thermostat, not just wire colors.
Intermittent Power Problems
Loose connections cause power to come and go. Check every wire connection and tighten as needed.
Some systems need a brief break-in period. Let the system run for a few hours before deciding it’s not working.
Alternative Solutions to Consider
Power extender kits work great, but they’re not your only option for solving C-wire problems.
Running New Thermostat Wire
Running a new wire bundle gives you the most reliable solution. But it requires fishing wire through walls, which can be tricky.
This option works best if you’re already doing other electrical work in your home.
Using an External Power Adapter
Some thermostats accept external power adapters that plug into wall outlets. This works if you have an outlet near your thermostat.
The downside is visible wires running to your thermostat. Not the cleanest look.
Maintenance and Long-Term Care
Power extender kits need very little maintenance once installed properly. But a few simple checks keep everything running smoothly.
Annual Connection Check
Once a year, turn off power and check that all wire connections remain tight. Vibration from your HVAC system can loosen connections over time.
Look for any signs of corrosion or damage on wire connections.
Monitor Thermostat Performance
Watch for signs that your power supply is weakening. These include dimming displays, slow Wi-Fi connections, or delayed responses to commands.
A well-installed power extender kit should provide years of reliable service.
Cost Comparison and Value
Power extender kits typically cost $20-50, depending on your thermostat brand. Professional installation adds $100-200 to the total cost.
Compare this to running new wire, which can cost $200-400 with professional installation. The power extender kit offers significant savings.
| Solution | DIY Cost | Professional Cost | Difficulty Level |
|---|---|---|---|
| Power Extender Kit | $20-50 | $120-250 | Moderate |
| New Wire Run | $30-80 | $200-400 | Hard |
| External Adapter | $15-30 | $80-150 | Easy |
Conclusion
Installing a thermostat power extender kit solves your C-wire problem without running new wires through your walls. The process takes about an hour and requires basic electrical skills.
Remember to turn off power before starting, take photos of your original wiring, and test all connections before putting everything back together. When done right, your smart thermostat will have steady power for all its advanced features.
The investment pays off through reliable thermostat operation and the energy savings that come with smart temperature control. Your home comfort system will thank you.
Can I install a power extender kit on any thermostat?
Power extender kits are designed for specific thermostat brands and models. Check that your kit is compatible with your exact thermostat before buying. Most major brands like Nest, Ecobee, and Honeywell make kits for their own thermostats.
What if my HVAC system doesn’t have a C terminal?
Older HVAC systems sometimes lack a C terminal on the control board. In this case, you may need to connect the power module to a different 24V power source on the board, or consult an HVAC technician for the best connection point.
Will a power extender kit work with a heat pump system?
Yes, power extender kits work with heat pump systems, but the wiring is more complex due to additional wires for heating and cooling functions. Double-check the kit instructions for heat pump-specific wiring diagrams.
How do I know if the installation worked correctly?
A successful installation shows steady power to your thermostat display, no battery low warnings, and normal heating and cooling operation. Your thermostat should maintain its Wi-Fi connection without dropping offline frequently.
Can a power extender kit damage my HVAC system?
When installed correctly according to the manufacturer’s instructions, power extender kits are safe and won’t damage your HVAC system. The kit is designed to work within your system’s normal operating parameters and includes built-in protection circuits.