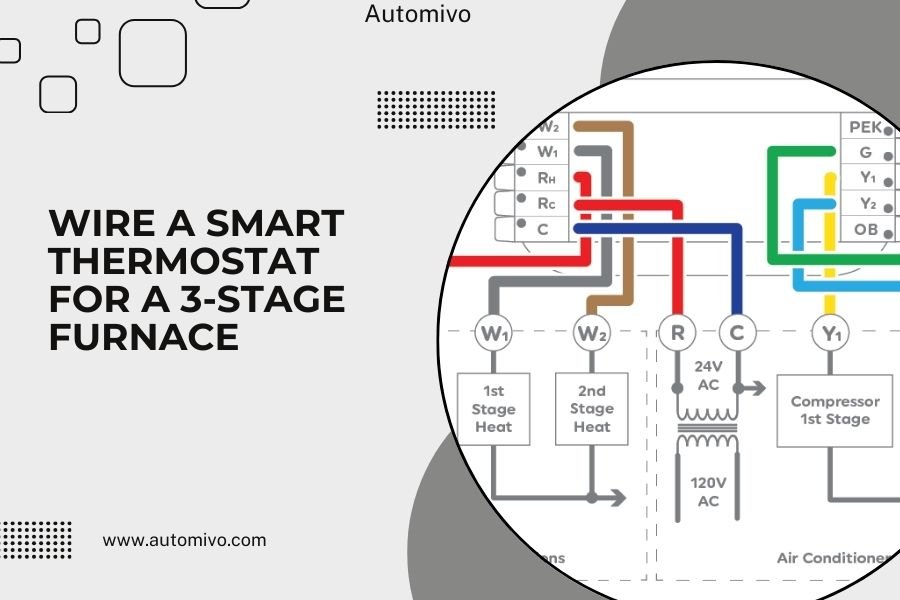
To wire a smart thermostat for a 3-stage furnace, you’ll connect the R, C, W1, W2, W3, Y, and G wires to their matching terminals on your new thermostat.
The key difference is using three separate heating wires (W1, W2, W3) instead of one, which allows your smart thermostat to control each heating stage independently for better efficiency.
Getting your 3-stage furnace connected to a smart thermostat might feel overwhelming at first. But once you understand the wire layout, it’s actually pretty straightforward. You just need to match each wire to the right terminal.
Let me walk you through this step by step. I’ve researched the most common wiring setups and found that most 3-stage systems follow the same basic pattern.
What Makes a 3-Stage Furnace Different
Your 3-stage furnace has three levels of heating power. Think of it like a car with multiple gears. Stage 1 runs at low heat for mild days. Stage 2 kicks in when it gets colder. Stage 3 fires up during really cold weather.
This setup saves energy because your furnace doesn’t run full blast all the time. Instead, it matches the heating output to what you actually need.
Why Smart Thermostats Work Well With 3-Stage Systems
Smart thermostats can learn your home’s heating patterns. They figure out when to use each stage for maximum comfort and savings.
I found that many HVAC experts recommend smart thermostats specifically for multi-stage systems. The automatic staging control can cut heating costs by 10-15% compared to basic thermostats.
Tools and Materials You’ll Need
Before you start, gather these items:
- Voltage tester or multimeter
- Wire strippers
- Screwdriver set
- Smartphone or tablet for setup
- Wire labels (helpful but not required)
Safety First
Turn off power to your furnace at the breaker box. This prevents electrical shock and protects your equipment.
Wait about 5 minutes after shutting off power. Some systems hold a charge for a few minutes.
Understanding Your Current Wiring
Take a photo of your existing thermostat wires before removing anything. This becomes your backup reference if something goes wrong.
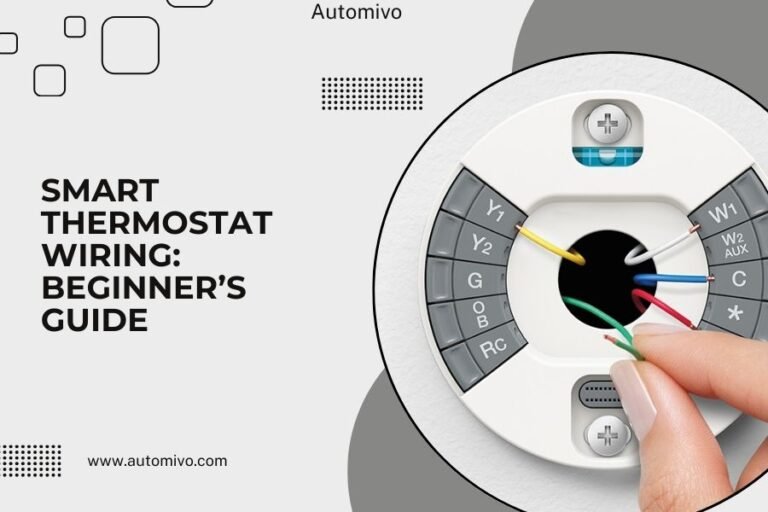
Most 3-stage furnaces use these wire colors and functions:
| Wire Color | Terminal | Function |
|---|---|---|
| Red | R or Rh | 24V power |
| Blue or Black | C | Common wire |
| White | W1 | Heat stage 1 |
| Yellow | W2 | Heat stage 2 |
| Brown or Orange | W3 | Heat stage 3 |
| Yellow | Y | Cooling |
| Green | G | Fan |
Wire Color Variations
Don’t panic if your wire colors don’t match exactly. Some installers use different colors. What matters is which terminal each wire connects to on your old thermostat.
I came across systems where installers used whatever wire colors they had available. The terminal connections matter more than the colors.
The Common Wire Situation
Many older thermostats don’t use a C wire. But smart thermostats need constant power to run their WiFi and display.
If you don’t have a C wire, you have a few options. Some smart thermostats come with power adapters. Others can steal power from other wires.
Removing Your Old Thermostat
Start by labeling each wire with tape. Write the terminal letter on each piece of tape.
Gently pull the wires out of their terminals. Some terminals use screws. Others have push-in connections that release when you press a tab.
Don’t Let Wires Fall Into the Wall
Tape the wires to the wall so they don’t slip back into the hole. Fishing them out later is a real pain.
Clean Up the Wall Area
Remove the old thermostat base from the wall. You might find some paint touch-up is needed around the edges.
Installing Your Smart Thermostat Base
Most smart thermostats come with a new wall plate. Position it level using the built-in bubble level or a separate level tool.
Mark the screw holes with a pencil. Drill pilot holes if you’re going into drywall or plaster.
Getting the Wires Ready
Strip about 1/4 inch of insulation from each wire end. Make sure the copper is clean and bright.
Twist any frayed wire strands together. This helps them go into the terminals cleanly.
Test Your Wires
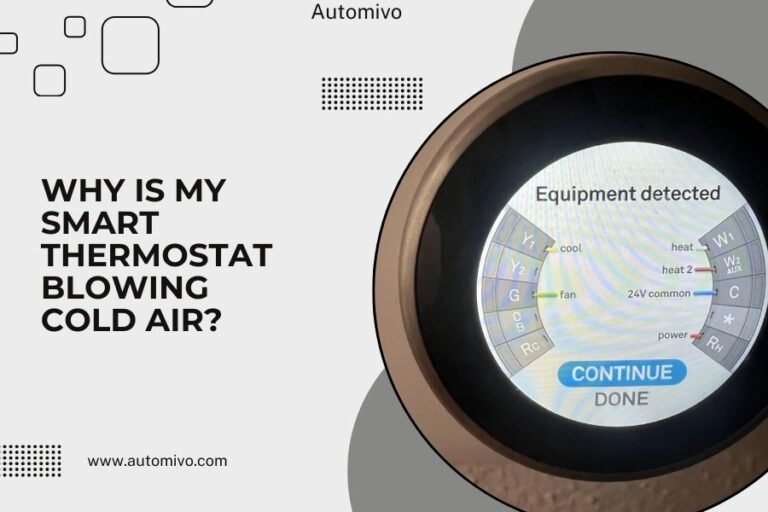
Before connecting anything, test that you have 24V between the R and C wires. This confirms your power is working correctly.
Connecting the Wires to Your Smart Thermostat
Now comes the main event. Connect each wire to its matching terminal on your smart thermostat base.
Start with the R wire (power). Then add the C wire (common). These two give your thermostat the electricity it needs to run.
Adding the Heating Stage Wires
Connect your heating stage wires in order:
- W1 terminal gets your first stage heating wire
- W2 terminal gets your second stage heating wire
- W3 terminal gets your third stage heating wire
Push each wire firmly into its terminal until you feel it grab. Give it a gentle tug to make sure it’s secure.
Cooling and Fan Connections
If your system has air conditioning, connect the cooling wire to the Y terminal. The fan wire goes to the G terminal.
Some 3-stage systems don’t have cooling. That’s totally fine. Just leave the Y terminal empty.
Smart Thermostat Setup Process
Attach your thermostat to its base. Most smart thermostats just click into place.
Turn the power back on at your breaker box. Your thermostat should light up and start its setup routine.
Configure Your System Type
Your smart thermostat will ask what type of system you have. Select “Heat Pump” or “Conventional” based on your furnace type.
When it asks about heating stages, select “3-Stage” or “Multi-Stage” heating. This tells the thermostat it can use all three heating levels.
WiFi and App Setup
Connect your thermostat to your home WiFi network. You’ll need your network name and password.
Download the manufacturer’s app on your phone. This lets you control your thermostat remotely and set up schedules.
Testing Your Installation
Start with a simple test. Set your thermostat a few degrees above room temperature and switch to heat mode.
You should hear your furnace start up within a few minutes. Let it run for 5-10 minutes to make sure everything works smoothly.
Testing Each Heating Stage
Some smart thermostats have a test mode that lets you manually activate each heating stage. Check your manual for this feature.
If manual testing isn’t available, you can trigger different stages by setting large temperature differences. A 5-degree jump might activate stage 2 or 3.
Checking Your System’s Response
Listen to your furnace during operation. Each stage should sound slightly different as more heating elements kick in.
I found that many homeowners notice their furnace running more quietly with a smart thermostat. The staged heating prevents the system from working as hard.
Common Wiring Problems and Solutions
If your thermostat shows an error message, check your wire connections first. Loose wires cause most installation problems.
Make sure each wire is pushed all the way into its terminal. Some terminals need extra pressure to make good contact.
No Power Issues
If your thermostat won’t turn on, you might have a power problem. Check that your furnace switch is on and the breaker hasn’t tripped.
Also verify that the R and C wires are in the right terminals. Swapping these can prevent the thermostat from getting power.
Heating Stages Not Working
If some heating stages don’t work, double-check your W1, W2, and W3 connections. These wires control each stage independently.
From what I read, many installation issues come from mixing up the W2 and Y wires. These are both yellow in some systems.
Optimizing Your 3-Stage System
Smart thermostats learn your home’s heating patterns over time. Give yours about a week to figure out your house’s thermal characteristics.
Set up a schedule that matches your daily routine. The thermostat can pre-heat using lower stages, which saves energy.
Understanding Stage Cycling
Your smart thermostat will try to maintain temperature using the lowest stage possible. It only moves to higher stages when needed.
This might mean your furnace runs longer but uses less energy overall. Don’t worry if it seems to run more often than your old thermostat.
Fine-Tuning Temperature Settings
Many smart thermostats let you adjust how aggressively they use each stage. Check your settings menu for options like “heating sensitivity” or “stage timing.”
Maintenance and Troubleshooting
Keep your thermostat’s software updated through the mobile app. Updates often include better staging algorithms and bug fixes.
Clean your thermostat’s screen monthly with a soft, dry cloth. Avoid using liquid cleaners that might damage the electronics.
Seasonal Adjustments
You might want to adjust your staging settings between seasons. Winter might need more aggressive staging, while spring and fall can use gentler transitions.
When to Call a Professional
If your furnace short cycles (turns on and off quickly), contact an HVAC technician. This can damage your equipment over time.
Also call for help if you smell gas, see sparks, or hear unusual noises from your furnace after installation.
Conclusion
Wiring a smart thermostat for your 3-stage furnace opens up better comfort control and energy savings. The key is matching each wire to the correct terminal and configuring your thermostat for multi-stage operation.
Take your time with the installation and don’t rush the testing phase. A properly installed smart thermostat will serve you well for many years while helping reduce your heating costs.
Can I install a smart thermostat on a 3-stage furnace myself?
Yes, most homeowners can handle this installation with basic tools and patience. The wiring follows standard patterns, and smart thermostats include detailed instructions. Just remember to turn off power first and take photos of your existing wiring before starting.
What happens if I don’t have a C wire for my smart thermostat?
Many smart thermostats include power adapter kits that work without a C wire. Some models can also draw power from other wires in your system. Check your thermostat’s documentation for C wire alternatives, or consider having an HVAC tech install one.
How do I know if my furnace is actually 3-stage?
Look at your current thermostat wiring for three heating wires (usually labeled W1, W2, W3). You can also check your furnace’s manual or nameplate for “3-stage,” “multi-stage,” or “modulating” heating. If unsure, an HVAC professional can identify your system type quickly.
Will a smart thermostat damage my 3-stage furnace?
No, when wired correctly, smart thermostats are designed to work safely with multi-stage systems. They often provide better protection than older thermostats through features like adaptive staging and system monitoring. Just make sure your chosen thermostat specifically supports 3-stage heating.
How long does it take for a smart thermostat to learn my 3-stage system?
Most smart thermostats need about one week to learn your home’s heating patterns and optimize stage usage. During this time, you might notice slightly different heating cycles as the thermostat figures out the most efficient way to maintain your desired temperatures.