Replacing a Honeywell thermostat with a smart one takes about 30-60 minutes and requires basic tools like a screwdriver and wire strippers.
You’ll need to turn off power at the breaker, remove the old thermostat, label the wires, and connect them to your new smart thermostat following the manufacturer’s wiring diagram.
Ready to upgrade your home’s comfort and save money on energy bills? Swapping out that old Honeywell thermostat for a smart model is easier than you think. I’ve researched this process and found that most homeowners can handle this project themselves with just a few tools and some patience.
Smart thermostats can cut your heating and cooling costs by 10-20% according to Energy Star. They learn your schedule, adjust temperatures automatically, and let you control your home’s climate from anywhere.
What You’ll Need Before Starting
Let’s gather your supplies first. You don’t need a full toolbox for this job.
Essential Tools
- Flathead and Phillips head screwdrivers
- Wire strippers or needle-nose pliers
- Voltage tester or multimeter
- Drill with bits (if mounting holes don’t align)
- Level (small one works fine)
- Smartphone or tablet for setup
Safety Equipment
Safety comes first. Grab a flashlight and maybe some electrical tape. You’ll also want your circuit breaker map handy.
Can’t find your breaker map? No worries. Most HVAC systems connect to a breaker labeled “furnace,” “AC,” or “HVAC.”
Turn Off Power Safely
This step isn’t optional. Skipping it could damage your equipment or hurt you.
Find Your HVAC Breaker
Head to your electrical panel. Look for breakers marked with HVAC-related names. Some homes have separate breakers for heating and cooling.
Flip the breaker to “off.” Then test it by trying to change the temperature on your current thermostat. Nothing should happen.
Double-Check With a Voltage Tester
Use your voltage tester on the thermostat wires. This confirms the power is really off. Better safe than sorry, right?
Remove Your Old Honeywell Thermostat
Time to say goodbye to your old thermostat. Most Honeywell models come off easily.
Take a Reference Photo
Before touching any wires, snap a photo with your phone. This picture will save you headaches later if you forget which wire goes where.
Label Your Wires
Each wire connects to a terminal with a letter. Common ones include:
- R or RH (red wire, power for heating)
- RC (red wire, power for cooling)
- W (white wire, heating)
- Y (yellow wire, cooling)
- G (green wire, fan)
- C (blue or black wire, common)
Write these letters on small pieces of tape and stick them to the corresponding wires. Your future self will thank you.
Disconnect the Wires
Loosen the terminal screws and gently pull out each wire. Keep them separated so they don’t touch each other or the wall.
What If You Don’t Have a C Wire?
Many older Honeywell thermostats don’t use a common wire. Smart thermostats usually need one for power. Don’t panic – you have options.
Check if there’s an unused wire in your bundle. Sometimes installers run extra wires but don’t connect them. You might find a blue or black wire tucked behind the thermostat.
Prepare Your Smart Thermostat
Unbox your new smart thermostat and read through the quick start guide. I know, I know – nobody likes reading manuals. But these guides show wire diagrams specific to your model.
Install the Mounting Plate
Most smart thermostats come with a new mounting plate. Hold it against the wall where your old thermostat was.
Do the screw holes line up? Great! If not, you’ll need to drill new holes. Use your level to make sure it’s straight.
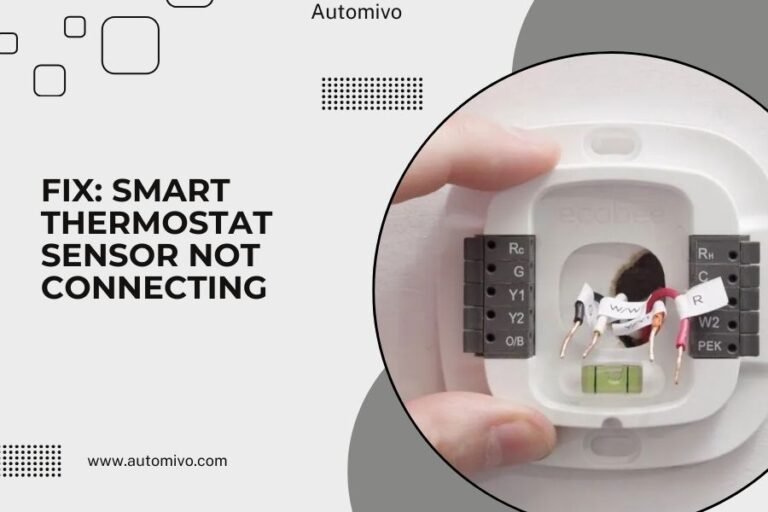
Connect Your Wires
This is where your labels and photo come in handy. Connect each wire to the same letter terminal on your new thermostat.
Push each wire firmly into its terminal. Most smart thermostats use push-in connectors instead of screws. You should hear a small click when the wire seats properly.
Dealing With Multiple Red Wires
Some systems have both RH and RC wires. Check your smart thermostat’s manual. Many models let you connect both reds to a single R terminal.
Install Your New Smart Thermostat
Gently push the extra wire length back into the wall opening. Then attach your new thermostat to its mounting plate.
Turn the Power Back On
Head back to your breaker panel and flip the HVAC breaker to “on.” Your new thermostat should light up or display something on its screen.
No display? Double-check your wire connections and make sure the breaker is really on.
Configure Your Smart Thermostat
Now comes the fun part – setting up all those smart features.
Download the App
Most smart thermostats work with smartphone apps. Download the one for your specific model from the App Store or Google Play.
Connect to WiFi
Your thermostat needs internet access for remote control and software updates. Follow the on-screen prompts to connect it to your home WiFi.
Having trouble? Make sure you’re entering the right WiFi password. Check that your router is working properly too.
Set Up Your System Type
Tell your thermostat what kind of HVAC system you have. Options usually include:
- Gas furnace with central air
- Heat pump
- Electric furnace
- Boiler with separate AC
Not sure? Check your furnace nameplate or look up your home’s specs online.
Test Your Installation
Time to make sure everything works correctly.
Test Heating
Set your thermostat 5 degrees warmer than the current temperature. You should hear your furnace kick on within a few minutes.
Feel warm air coming from your vents? Perfect! Let it run for 5-10 minutes, then set it back to normal.
Test Cooling
Set the temperature 5 degrees cooler than current. Your AC should start up and blow cold air.
Both heating and cooling work? You’re almost done!
Test the Fan
Try running just the fan without heating or cooling. This makes sure your G wire connection is solid.
Smart Features Setup
Here’s where your new thermostat shines compared to that old Honeywell.
Create a Schedule
Smart thermostats save money by adjusting temperatures when you’re away or sleeping. Set up a weekly schedule in your app.
Research from the EPA shows that lowering your thermostat 7-10 degrees for 8 hours daily can save 10% on heating and cooling costs.
Sample Schedule Ideas
| Time | Weekday Setting | Weekend Setting |
|---|---|---|
| 6 AM – 8 AM | 72°F (getting ready) | 70°F (sleeping in) |
| 8 AM – 5 PM | 65°F (at work) | 72°F (home) |
| 5 PM – 10 PM | 72°F (evening) | 72°F (evening) |
| 10 PM – 6 AM | 68°F (sleeping) | 68°F (sleeping) |
Enable Learning Features
Many smart thermostats learn your habits over time. Turn on this feature if your model has it.
The thermostat will notice patterns like when you come home early on Fridays or stay up late on weekends. Pretty cool, right?
Troubleshooting Common Issues
Sometimes things don’t go perfectly. Here are solutions to problems I found homeowners face most often.
Thermostat Won’t Turn On
Check these things in order:
- Is the breaker really on?
- Are all wire connections secure?
- Do you have a C wire connected?
- Is there a fuse blown in your furnace?
Heating or Cooling Won’t Start
Your thermostat might have the wrong system type selected. Go back into settings and double-check this.
Also verify that your old Honeywell thermostat worked properly before you removed it. If it had issues, the problem might be with your HVAC system, not the new thermostat.
WiFi Connection Problems
Smart thermostats need strong WiFi signals. If your thermostat location has weak signal, consider adding a WiFi extender.
Some thermostats work better on 2.4GHz networks instead of 5GHz. Check your router settings.
When to Call a Professional
Most Honeywell thermostat replacements go smoothly. But sometimes you need backup.
Complex Wiring Situations
Call an HVAC tech if you have:
- More than 6 wires
- Multiple HVAC systems
- Heat pump with auxiliary heat
- Boiler with multiple zones
No C Wire Solutions
Adding a C wire often means running new cable from your furnace to your thermostat. This job usually requires an electrician or HVAC professional.
Some smart thermostats include adapter kits for systems without C wires. But installation can be tricky.
Maximizing Your Smart Thermostat Benefits
You’ve got your new thermostat installed. Now let’s make sure you get the most value from it.
Use Geofencing
Many smart thermostats can detect when you leave or return home using your phone’s location. This feature automatically adjusts temperatures.
Set up geofencing with a radius that makes sense for your commute. Too small and your house won’t be comfortable when you arrive. Too large and you won’t save energy.
Monitor Your Energy Reports
Most smart thermostat apps provide monthly energy reports. These show how much heating and cooling you used compared to similar homes.
Pay attention to these reports. They help you spot unusual patterns that might indicate equipment problems.
Set Temperature Alerts
Configure alerts for extreme temperatures. This helps you catch equipment failures quickly, potentially preventing frozen pipes or heat damage.
Maintenance Tips for Long-Term Success
Your smart thermostat needs minimal maintenance, but a little care goes a long way.
Keep Software Updated
Most smart thermostats update automatically when connected to WiFi. But check occasionally to make sure you have the latest features and security patches.
Clean the Display
Dust and fingerprints can make touchscreens less responsive. Wipe your thermostat’s display monthly with a soft, slightly damp cloth.
Avoid harsh cleaners that might damage the screen or plastic housing.
Conclusion
Replacing your Honeywell thermostat with a smart one opens up a world of convenience and energy savings. The installation process might seem intimidating at first, but breaking it down into steps makes it manageable for most homeowners. You’ll turn off the power, label and disconnect your old wires, install the new mounting plate, connect the wires to your smart thermostat, and configure the settings.
The time you invest in this upgrade pays dividends through lower energy bills, better comfort control, and the convenience of managing your home’s temperature from anywhere. Remember to test all your HVAC functions after installation and take advantage of smart features like scheduling and geofencing to maximize your savings.
Can I install a smart thermostat if my old Honeywell only has 4 wires?
Yes, many smart thermostats work with 4-wire systems, though you might miss some features without a C wire. Look for models that specifically support 4-wire installations or include power extender kits. Some brands offer battery-powered options that don’t require a C wire at all.
Will my smart thermostat work if my internet goes down?
Absolutely. Smart thermostats function as regular programmable thermostats even without internet. You’ll lose remote control and app features temporarily, but your heating and cooling will continue working normally. Your programmed schedule will still run automatically.
How do I know if my HVAC system is compatible with smart thermostats?
Most central heating and cooling systems work with smart thermostats. Check compatibility by looking at your current wires and system type. Avoid smart thermostats if you have electric baseboard heat, some radiant systems, or very old heating systems without standard wire connections.
What should I do with my old Honeywell thermostat after replacement?
Keep it as a backup in case your smart thermostat fails. Store it with any mounting hardware in a labeled bag. Some electronic recycling centers accept old thermostats, especially if they contain mercury. Check with your local waste management for proper disposal options.
Why does my new smart thermostat say “delayed” when I try to turn on heating or cooling?
This delay protects your HVAC equipment from damage. Most systems need 3-5 minutes between cycles to prevent compressor issues. Smart thermostats enforce this waiting period automatically. The delay is normal and shows your thermostat is working correctly to extend your equipment’s life.